41 Matrix: Skyline-Residential Buildings
The aim of this guide is introduce you with the process of creating a standardized collection of residential buildings for a chosen country/region with illustraStock’s standards.
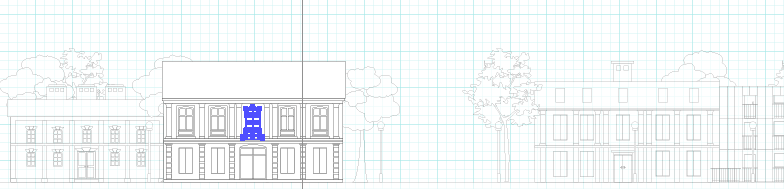
Skyline > Constructions > Residences
The Residences Sub-category contain the following types of houses:
- Detached (One-dwelling buildings)
- Houses which stand alone, for one or more family, typical for village or a town. This includes but is not restricted to: bungalows, villas, chalets, forest lodges, farmhouses, country houses, summer houses, weekend houses.
- Semi detached (Two-dwelling buildings)
- Two family houses with two separate entrances living in one unit. This includes but is not restricted to: semi-detached or terraced houses, with each dwelling having its own roof and its own entrance directly from ground surface
- Block of flats (Three-and more dwelling buildings)
- Urban residential buildings, typical for large cities (multiple stories). This includes but is not restricted to: flat blocks, apartment houses, residential buildings for communities, with three or more dwellings.
Each file it contains just one Type of houses (But can contain several variations of the house).
After creating all required houses you will assemble houses together (you can repeat the houses if necessary) to create long and short streets. Each collection contain the following types of streets:
- A short street (offer 2 blocks with streets on both sides) in a short template.
- A long street (offer a block with street of both sides and a block with streets on both sides and one central street) in a long template 10x.
Three versions of streets for each of aforementioned type are required:
- Village street (A village is a small community in a rural area).
- Town street (A town is a populated area with fixed boundaries and a local government).
- City street (A city is a large or important town).
Illustrations that we create are a representation of real-life proportions in a 1:250 scale (Remember, that is the scale for Skyline illustrations). As you know from reading the Designers Guide, the base unit for all illustrations are pixels. For this reason, you have to convert dimensions of all extra elements that you create into pixels, basing on the following proportion: 1m=22,677px. For more details, please refer to the file 0000_Matrix_Template_Measures_1-250.
 You will create three different types of streets representing a street of a village, a town and a city in your chosen architectural style. It is important to ensure that building heights, spacing between houses and densities are representative for a village or a city and reflects regional characteristics. Add vegetation and street components such as street lanterns, fences which which are representative for your chosen country/region. If you can’t find them in the illustration-sync folder, consult with your supervisor and seek his permission to create additional components to better reflect the character of chosen country/region. Do not include people, animals or cars in your illustrations of streets. Follow drawing rules explained in the previous section.
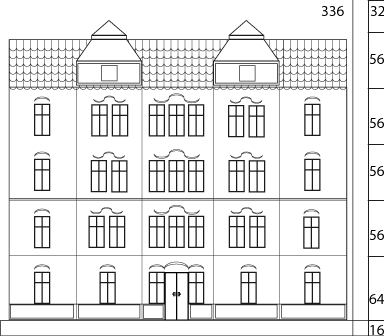
Width —
For residential houses, only the following building widths are allowed, all of which are multiples of 64 or 32 (with 240px as exception):
- Detached (One-dwelling buildings): (64px, 96px), 128px, 160px, 192px, 224px, 256px, 288px, 320px or 384px.
- Semi detached (Two-dwelling buildings): 192px, (240px), 256px, 288px, 320px or 384px.
- Block of flats (Three-and more dwelling buildings): 192px, 224px, (240px) 256px, 288px, 320px, 384px, 448px, (480px) or 576px.
Caption:
- Bold: Recomended sizes.
- (Parenthesis): Secodary recomendations.
- Underline: Low recomended.
- Other: Other options.
This is the dimension of the main ‘base’ of the house, and does not include rooflines or other details. [pic needed]
For the creation of houses, we have several types of templates for different purposes. For the creation of simple buildings or for the creation of streets.
- 1x 10 template: The 1x 10 template have 10 artboards of 192px.
- 2x 6 template: The 2x 6 template have 6 artboards of 384px.
- 3x 4 template: The 3x 4 template have 4 artboards of 576.
- 6x template: The 6x (1.152px) template have 6 times 192px, but as we have always 192px of non available zone as street, the real dimensions of the template are 960px (or 5 units of 192px or 15 units of 64px).
- 10x template: The 10x (1.920px) template have 10 times 192px, but as we have always 192px of non available zone as street, the real dimensions of the template are 1.728px (or 9 units of 192px or 27 units of 64px).
The illustrations of the houses or streets are always inside of Scenefront artboard.
The next table helps to understand how to mix the houses. The templates are created with a base of 192px.
| px | number of times 1.92 | Required times | number of times 192 |
| 64 | 0,33 | 3 | 1 |
| 96 | 0,5 | 2 | 1 |
| 128 | 0,67 | 3 | 2 |
| 160 | 0,83 | 3 | 2,5 |
| 192 | 1 | 1 | 1 |
| 224 | 1,17 | 3 | 3,5 |
| 240 | 1,25 | 2 | 2,5 |
| 256 | 1,33 | 3 | 4 |
| 288 | 1,5 | 2 | 3 |
| 320 | 1,67 | 3 | 5 |
| 384 | 2 | 1 | 2 |
| 448 | 2,33 | 3 | 7 |
| 480 | 2,5 | 2 | 5 |
| 576 | 3 | 1 | 3 |
Street width
| px | m | |
| Roads | 80px | (3,25-3,75) |
| Urban central reservation | 64-80-96-112-128px | (3-6) |
| Rural central reservation | 32px | (1,5) |
| Streets | 64-80px | (3-3,5) |
| Street access | 64px | (2,75-3) |
| Urban verge | 24px | (1) |
| Rural verge | 48-64px | (2-3) |
| Sidewalk | 96-112-128px | (4-6) |
| Town Sidewalk | 34-48-64-80-96px |
(1,5-4) |
| Private sidewalk | 64px | (3) |
| Parallel parking | 48px | (2-2,25) |
| 45º parking | 112px | (4-5,5) |
| 90º parking | 112-128px | (4,5-5) |
| Bus lane | 80px | (3,25-4) |
| Bike lane | 32-48px | (1,5-2) |
| Tot. minimum for a Village | 128px | (6) |
| Tot. minimum for a Town |
256 | (12) |
| Tot. minimum for a city |
448px |
(20) |
| 224 | (10) |
Lighting each 448px (around 20mtr).
http://www.carreteros.org/normativa/travesias/pdfs/ccaa_pdf/ivp_ay_madrid.pdf
Height |
The height of ground floor is always 64px. The height of every next floor (1st, 2nd and so on) except for roof level is 56px. You can choose the height of roofs level, however, make sure that it that the whole building wil still fit into a template. Make sure that you use the same roof heights/ lopes across your collection.
Once you create a few prototypes of houses for your collection, get in touch with your supervisor to review whether your illustrations follow the guidelines and get approval of choses roof style and dimensions
Grouping
All elements of illustrations have to be grouped logically and systematically which makes them easier to edit and modify. This way the building can be easily used by another illustrator and transferred out to another file.
The full illustration must be a group.
All floors (the whole building) have to be grouped together.
All elements of one floor of a buildings have to be grouped together.
Each component such as roof, window, door is one group.
Make sure you follow the guidance on grouping keeping each building as a separate group and once you are finished group together all elements making up the street.
Make sure that all components which make up a street are contained within the artboard and do not exceed borders of the artboard.
Components and details for houses
All components of houses such as roofs, doors, windows, stairs, balconies, columns… follow the 64 px grid system. As much as possible, use components from premade collections from the illustration-sync folder. (If you can’t access them, ask!). That will not only speed up your work but also will help to maintain visual integrity across all illustrations.
The company provides sets of standardized, user-friendly vector illustrations. In order to deliver high quality experience for users and speed up your workflow it is important that you familiarize yourself and closely follow the company guidelines.
It is important to repeatedly use components such as window/roof styles in your houses belonging to the same collection to make the collection visually coherent. Do not create additional components for one specific building as it will not fit the rest of the collection.
To create additional components is not allowed. But if you notice that some components are missing or you require additional elements to better represent chosen architectural styles, you can create new components such as roofs, doors or windows. Remember about allowed proportions/dimensions: 2, 4, 8, [16, [32, 64,] 128, 256 or combinations of them. However, seek a permission to create extra components and make sure that you understand how to create them and where to store them before starting work.
When creating a street make sure that bottoms of houses are aligned on the line, which represents the level of the ground. This line is located 16 px above the bottom edge of the template. You are not required to draw roads or pavements, unless otherwise stated by your supervisor. Any roads, pavements or waters such as a lake have to be located on or below the line.