26 Exporting
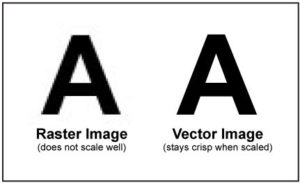
Let’s explain what the recommendations for exporting the illustrations are. We are going to focus on explaining how they would be created with Vector files. These recommendations will not always be valid for files made with Photoshop or similar programs for editing and creating raster files, as they will be limited to the maximum resolution created in the original file.
The first and most important thing is to know that they are the dpi.
Dots per inch (dpi) is a unit of measurement for printing resolutions, namely the number of individual ink points that a printer or screen can produce in a one-inch linear space.
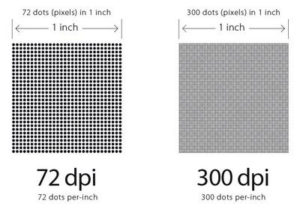
Generally, higher the definition (a high number of dpi) is, sharper and more detailed the print is. A dot matrix printer (low resolution) can print values between 60-90 dpi (a newspaper). An injection printer is capable of reaching 300 dpi (high quality photos). And a laser printer (high resolution) can reach values between 600-1200 dpi. In the case of telephone or computer screens, the thing is much more varied, although it is usual to use several aspect ratios making all the monitors proportional among those who have the same aspect ratio. Anyway, this should not worry us because it is normal that there is a workspace of a predetermined size. That way the work surface is the same regardless of the monitor used.
Everything also depends on the distance and its use. To print a poster, we can use values of 72 dpi because we are going to see it from a distance. A photograph or a textbook values 240-300 dpi. It would not be necessary to print it at higher resolutions because a current printer would not be prepared to accept higher resolutions, being the maximum resolution of the document allows this one. The human eye also has a limit on the number of dpi that can differentiate where there is hardly any difference from 300 dpi. Higher resolutions would only imply a greater weight of the digital file. But when we are going to print on the screen, the thing starts to be a bit more colorful.
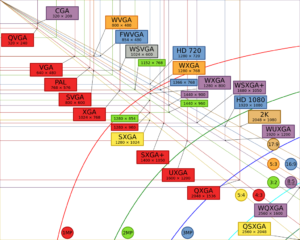
The monitors have a size in pixels and a resolution that is given by their concentration per unit of measure, that is to say, the amount of pixels that we can locate. The higher the resolution, the higher the quality. A 1280 × 800 monitor can represent 1280 pixels horizontally and 800 vertically and offer more detail at higher resolution. Imagine making a bridge with Lego Duplo figures and the same bridge with traditional Lego figures. The traditional Lego pieces would allow a greater detail for the same bridge of the same measures. That is the resolution of the monitor.
A digital image is determined by its size in pixels. At higher resolution (more pixels on the screen) more centimeters would occupy the image on the monitor, but could get higher quality and due to its being digital, then we could visualize it in an area inferior to the one that was created the image thus increasing its resolution. But in a resolution forced by us, it would not naturalize that image. Any density that we intend to assign to that image when we export it would not influence its quality. It would store this information for later printing on paper, but for its display on the monitor it is irrelevant that it has in its exportation 72 dpi that 300 dpi.
You can only vary the quality of an illustration by increasing or decreasing the pixels (px) of the illustration. An illustration at 1024 px has twice the quality of one at 512 px. And if we put an illustration of 1024 px in a space of 512 px, it will have twice the density but because we compressed it to fit the space, not because the image in a natural way has that quality. If we leave it in a place where it can occupy the pixels that correspond to it, it would return to its normal density. Adjusting the sizes and qualities requires mathematical calculations that although they may seem complex they are not. In addition to the templates we have designed, where everything is multiple of 64, it is easy to do calculations to fit the illustrations. So you need to pay attention to the ppi of the monitors and think about how many pixels have resolution, in my case 1280 × 800.
Imagine that we want to have an illustration in a space of 750 × 750 pixels. We have two options:
- Use a vector file in SVG format.
In which case we do not have to worry about the resolution or size because the vector files are adapted to the area that we want. Although extreme sizes can distort the design.
- Use a Raster file in GIF / PNG format.
Raster files should be exported by adjusting to the size. We want to create files with the highest quality and the lowest possible weight.
Let’s follow the illustration example at 750 × 750 px. When we export this Vector file (svg) to its Raster version (png, gif, jpg), three situations can occur:
- When the file is exported, it is larger than 750 × 750 px. This export would force us to zoom to reduce the illustration. This export would cause a page load delay due to the extra weight of the file. This would happen if we have a worktable at 750 × 750 px and instead of exporting to 72 ppi, we increase the resolution of the illustration. As we have said, the resolution in digital images increases, increasing its size in pixels.
- When the file is exported, the size is less than 750 × 750 px. This export would force us to zoom in to increase the illustration. This export would cause the image to be pixelated, which would weigh less than if it were the right size but at the cost of a loss of quality. This would occur if we give the illustration a value of ppi less than 72, although it is not common that such situation occurs. To make reductions, it is best to export to 72, and then, using an image resizing program, adjust the image to the size that we want.
- When the file is exported, it has a size of 750 × 750 px. This export is the best since we adjust the quality/weight to our needs. If the work table has 750 × 750 px, we would simply export to 72 ppi.
If we want to see what happens when we export to lower sizes and we intend to fit an image to a size of 512 px, we can access this example.
If you are using Photoshop, modifying the image to add more pixels is known as interpolation. When using vector tools we would not have any problems, it will not be the case when using Photoshop.
Currently we have 3 sizes in templates 2048, 2014 and 512 px per side. Howewer exporting a vector file from Illustrator for each template will give us two types of results:
- If the export is from the work table and at 72 ppi, the result will be a file with the size of the work table next to the blank/transparent spaces that surround it. If we had an illustration at 512 px, the result will be a Raster file (png or gif or jpg) at 512 px at 72 ppi.
- If the export is from the file, only the illustration will be exported. There will not be a blank/transparent space between the illustration and the border with a bleed as when exporting the work table.
Both illustrations can be adjusted to fit a desired size with export by adjusting the ppi. Although it has no relevance in the quality of the illustration as we mentioned before, illustrator adjusts the final density of pixels by increasing the size in pixels of the illustration. If we want an illustration from 512 px to 142 ppi for later use printed on paper for later use, we must export it to 142 dpi obtaining a result of 1024 px, this illustration would be printed on paper occupying the same area as the original sketch in centimeters when we printed it. However, if we show the illustration on an area of 512 px, the visual result obtained would be 512 px at 142 ppi, although the original exported file would have a real size as we have said of 1024 px but at 72 ppi of real density in its Metadata would put 142 ppi. A bit lousy at first.
Howewer the first case will be more difficult to adjust because the resizing will be done to the entire file, including white/transparent parts. We can get an idea because as we have created the illustrations in Isometric 2: 1, each unit has 64 × 32 px or multiples of this and if a file in which the work table is 512 px and the final result of the export has been 1024 px (double), the illustration inside it will go from 64 × 32 px to 128 × 64 px (the double also).
In the second case, if the illustration has a base of 64 × 32 px, the final output will be 64 × 32 px.
And now comes the complicated part, as we have made illustrations with vector programs, we can resize them to give greater detail and adjust them to a specific space.
If we simply want to increase the size of the illustration, it is enough to make the export by adjusting the ppi by increasing it to multiples of 72. For example, an illustration at 144 ppi will be twice as big as one at 72 ppi. If we want an illustration of 64 × 32 px to be equal to one of 128 × 64 px, we will simply export to 144 ppi, if we want it to be 3 times larger, with an export to 216 ppi, we would get an illustration at 192 × 96 Px.
To get special or specific sizes, you would need to do some calculations. Given the standardized nature of all created materials it is easy to know how to export most of the illustrations that are created with a desktop size, or base units that are multiples of 64 (64-128-196-256-320- 384-512-640-768-960-1024-2048).
To make the calculations, we use the following formula:
Cm * ppi / P = Px (Centimeters * ppi / Inches = Wide or long pixels)
P * Px / cm = ppi (Inches * Wide or long pixels / Centimeters = pixels per inch)
Although for exports in which a specific size is not necessary, we can export with Illustrator in multiples of 72 px to increase the size of the illustration. Let’s look at several examples of export in which we fit the illustration to a size of 512 px. In these illustrations we would adjust the export ppi resolution to:
- 64 × 32 px = 576
- 128 × 64 px = 288
- 192 × 196 px = 192
- 256 × 128 px = 144
Anyway, the normal thing will be to make 3 times bigger the illustration so as to be able to see the details of this one better. To make an export 3 times bigger you have to multiply 72ppi x 3 = 216 ppi
- The pixel is a small square that is the smallest unit of measure of the size of a digital image. It is the name of an each of the specks [d1] of the monitor or of an impression. On the screens of a digital device such as the computer monitor, there can be a set ofresolution indicated in pixels, for example 1200 × 800 px.
- A megapixel, literally, equals one million pixels. Usually, we use this measure to refer to the surface of the digital image. In this way, a digital photograph that measures 1200 x 800, has 960,000 pixels or, which is the same, 0.96 megapixels.
- The centimeter or inch are units of measurement that we can use for printed photographs, but not for digital images. An inch is 2.54 centimeters.
An example would be if we export an illustration from 512 px to 72 ppi. The result would be an illustration of 512 px at 72 ppi. But if we export it to 144 ppi, the result would be an illustration at 1024 px.
You can not change their concentration in pixels. In an image this can only be done if we decrease the space it occupies on the screen. This means that we can not vary your ppi. So no matter what resolution we export for screens, we always get 72 ppi.
That setting has absolutely no meaning when exporting your photos to the web. You can set it to any number you want, 1 being the smallest and 65000 being the highest number you can use. Whatever number you type in, Lightroom will simply write that number into the file as a reference for printing purposes. If anybody decides to print your image, your printer will most likely default to this resolution/PPI setting. But it really does not matter, because DPI can be changed at the time of printing anyway. I leave mine at 72 pixels per inch.